I made a "real" tutorial, go figure! What's even
weirder in my world, is that it's up for all to
see at
Gingersnap Creations . . . would you please
imagine some Twilight Zone type music at this point?
Super Simple Bookbinding Tutorial Stuff you will need:
paper for the pages--plain, colored, or
various papers such as: security papers (from envelopes),
handmade papers, sheet music, ledger paper, pages from books,
vellum, patterned papers
heavy weight cardstock for cover--I usually collage mine first
ruler pencilpunch tool—either a fancy Japanese screw punch or the type with
a needle like tip. If you do not have a punch tool, they are very
inexpensive, or you can make your own using a sturdy tapestry/darning
needle with the eye end shoved into the end of a large cork.
2 or 3 book binding clips--those big black clips with the silver
flippy sides, available in most office supply sections of stores,
or (where else?) any office supply store
scissors some type of "thread"--waxed linen thread, beading thread,
embroidery floss, or narrow ribbon--whatever you want to use
to bind your book
tapestry needle--basically any needle with an eye big enough to
hold your thread
work pad such as a folded up towel, magazine, phone book
What to do:Determine how big you want to make your book, and cut or
tear the two cover pieces to size. I like using a ruler as
a straight edge and tearing at least one side of the cover,
leaving a distressed edge.

Now, select the various papers you’d like to use as pages in
your book. I generally use some ledger paper, vintage blank
music note paper, handmade papers, some patterned papers, and
vellum. You may prefer to have your pages all the same size;
I make mine a variety of sizes. You may even want some of the
pages to extend beyond the cover of your book—whatever your
personal preference.
If you plan to stamp on your pages, or distress the edges,
it’s a whole lot easier to do BEFORE binding the book, but
I almost always construct the book prior to knowing exactly
what's going to happen between the pages. If you decide to
distress/stamp/etc. before binding, keep in mind that your
pages are going to be bound about ¼ inch in from the left side.
On the front cover of the book, measure in about ¼ inch from
the book spine, and make a straight line from top to bottom.
About ¼ inch from the top, and ¼ inch from the bottom, make
a dot—these will be holes for binding.
Measure halfway between those two dots, and mark another hole
spot. You may want to stop with three holes, but if you prefer
five, measure again, half way between the middle hole and the
two outside holes, and making two more dots to punch.

After you have your hole spots marked, sandwich your lined-up
pages in between the covers, lining up the edges to be bound,
and clip together with a couple book binding clips. Place the
book sandwich on a work pad of some kind, such as a folded up
towel, old magazine, or phone book. This is so your don't
scratch up your table and dull your punch tool.
Carefully punch through the hole spots you marked, using the
punch tool. You may need to twist slightly, not just jab
straight through, depending on how thick your pages are.
Thread your tapestry needle and knot the end of your binding
thread/ribbon.
Okay, are you ready for this? Here's a video, which is
a whole lot easier to follow than written directions
when it comes to something like this, but you'll have
to bear with me and be merciful. We've never made a
video before, and I sound like total dork, but at least
you'll be able to follow along . . . I hope . . . and
yes, that
is a
rooster crowing in the background!
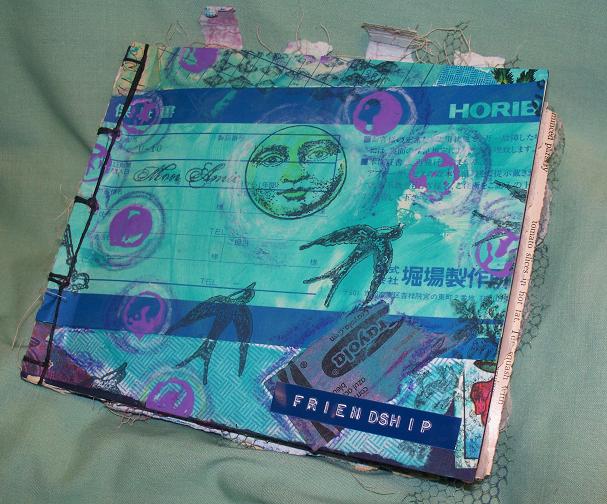
Need some ideas? Here are some books I've made using
this super simple book binding technique:
SpringHowdy cover and layout,
Howdy LO,
another Howdy LOGarden book cover,
Titania LO from garden book
Hot Beverages,
coffee LOs,
tea LOs,
final pagesOver at
Bella Creations, the September challenge
for the
l'a arte transforme group is to share
a favorite technique--this is one of mine! :)