
Tuesday, December 19, 2017
wintery watercolor cards
Friday, December 08, 2017
Altered Canning Jar Band Ornaments
Love making these!

 You'll find a quick how-to on making these at CutCardStock, and more details on those gorgeous little angels and pretty pink bells at Altered Pages Artsociates.


Saturday, November 25, 2017
Easy Envelope Advent Calendar
Easy Envelope Advent Calendar, in my post today at CutCardStock--so fun to make, and simple, too!
 Envelopes, patterned papers, glitter papers, and Christmas collage images from Altered Pages. I used the Holiday Postcards, Christmas Minibook, and Santa Santa Santa--there are tons more to choose from, and not just in traditional red and greens.
For all the collage images you need, plus the numbers, you can download the Altered Pages kit HERE. Just add your own envelopes, grab a gluestick, and have at it!

For all the collage images you need, plus the numbers, you can download the Altered Pages kit HERE. Just add your own envelopes, grab a gluestick, and have at it!
Thursday, November 02, 2017

Wednesday, November 01, 2017
getting ready for Christmas--a few of my favorite things
Textured paper, shiny paper, textured paper, and sparkly stuff!
 Glitter paper = good.
More info in my post today at the CutCardStock blog. ALL of the collage images are from this Vintage Christmas Angels collage page at Altered Pages.

More info in my post today at the CutCardStock blog. ALL of the collage images are from this Vintage Christmas Angels collage page at Altered Pages.
Thursday, October 26, 2017

Thursday, October 19, 2017
a little beeswax experiment
Been playing with beeswax lately, and my first play is up today at Altered Pages . . .
 The wax is a little milkier than I'd like, but the depth and the layers is fun--you'll find this one HERE.

Thursday, October 12, 2017
teeny tiny tea wallet
SO easy to make, and a sweet little gift--the pockets in these little booklets could also hold??? I dunno, but these are easy to make in quantity, so perfect for party, shower, or wedding favors.
 You'll find full (but brief, 'cause these are EASY!) directions HERE.

Thursday, October 05, 2017
live--stenciled, collaged heart

I have come that they may have life, and that they may have it more abundantly. John 10:10
Thursday, September 28, 2017
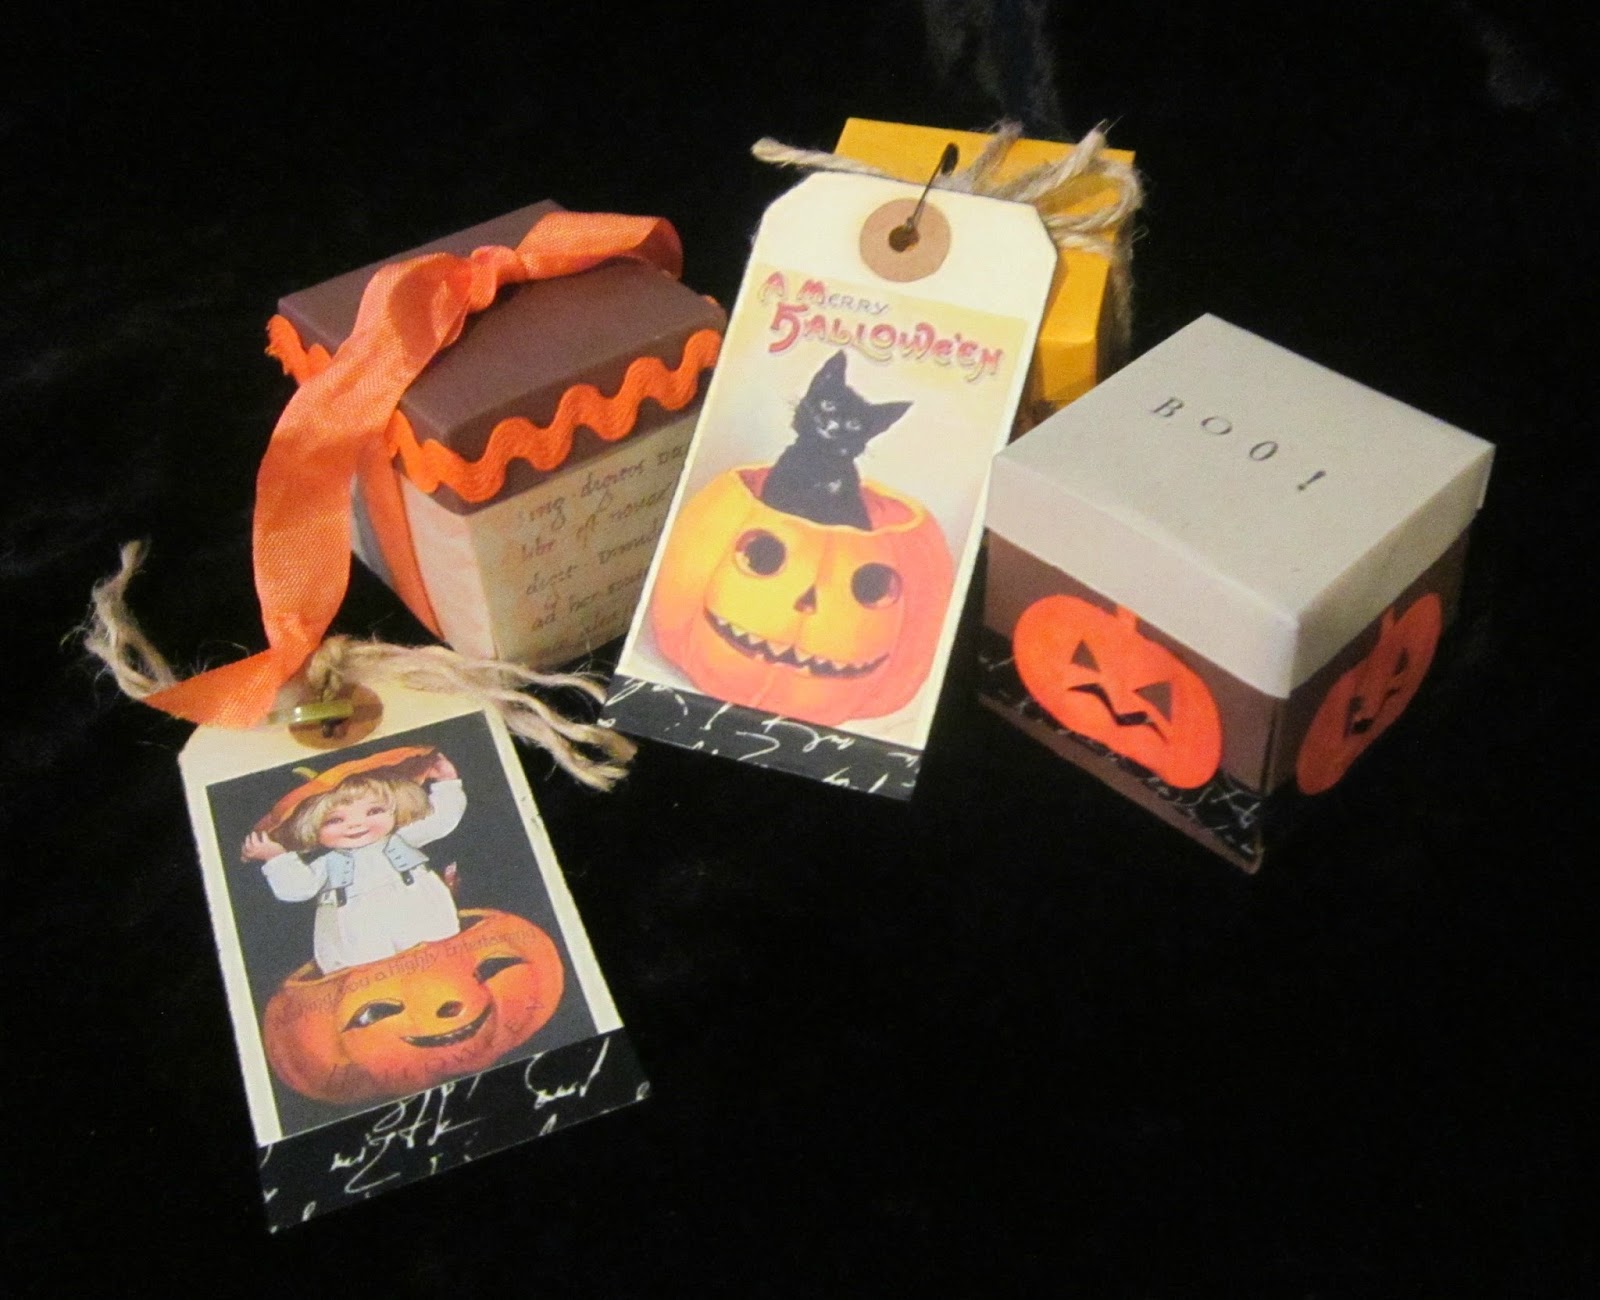
tiny little treat boxes
Years ago, my friend Rhonda showed me how to make these treat boxes, so I'm assuming that some of you are already familiar with these. SUPER easy to make, and they can be embellished (or left clean and simple) at will.
 You'll find the easy how-to in my post today at CutCardStock, where ALL the orange, brown, kraft, and gold cardstock is on sale. Plus, at Altered Pages, there are still a couple of days left to join in the tag challenge, complete with 5 prize packs. Treats!!! :)
Thursday, September 21, 2017
tags tags tags. and a challenge. and free stuff.
Ooooh, a tag challenge at Altered Pages--with free stuff, too! Check it out, check it out! All through September. Just a peek at some of my tagged up things:


 Yes, I maybe might use a few tags now and again . . .


Tuesday, September 12, 2017
really simple hand painted cards

Thursday, September 07, 2017
tiny little book with wooden covers
I think this will end up being butterfly themed, but for now, this little book has a monoprint cover, the insides are painted, with a simple tie binding.
 How to details are HERE.

Thursday, August 31, 2017
added a cover to the ABC book, and D is for . . .
You can see it today at the CutCardStock blog. Plus what E is for. Plus a little extra sumthin' just for fun.


Friday, August 11, 2017

Thursday, August 10, 2017
ABCs--a mixed media handbound primer
Here's "B is for . . ."---you'll find "A is for . . ." today at the CutCardStock blog, along with a simple tutorial for stitching together multiple signatures for a handbound book.


 |
| A is for . . . |
Thursday, August 03, 2017
grandbaby girl in a Prima flower frame

Tuesday, July 25, 2017
Simple but glittery DIY favor bags
Simple, but as glittery as it gets--I'm loving these!
 You can probably figure these out by looking at the photo, but you can find the quick how-to HERE.

Thursday, July 20, 2017
stamping on monoprints
Today at Altered Pages, I'm sharing some cards created using a really pretty stamp from Lost Coast Designs and some not-so-pretty monoprints.
 This one is my favorite, there are several more in the share post. Love that Lost coast stamp!

Tuesday, July 11, 2017
Galactic Starveyors daily verses in English and Spanish
These are the actual verses with the "constellations," NOT just the "addresses!" You should be able to download these by right clicking and saving. Or you might have to click, then right click, and save. If the Spanish translations are wonky, let me know--Google Translate can be a little sketchy sometimes! We printed these as 5x7, on sticker labels, and trimmed extra white from the tops and bottoms with a paper cutter to use in scrapbooks for the week of VBS 2017.


Shine On--Congratulations card
You know I don't make a lot of cards, but I do like to make wedding cards to match the couple's colors. At the CutCardStock blog, you'll find this easy but elegant card, suitable for any Congratulations occasion. When the cardstock is as shimmery silver as this, it doesn't need any help being gorgeous! But you know it's notoriously difficult to photograph shine.
 And okay, yes, I do have a thing for torn edges!
Have a great Tuesday!
:)

Have a great Tuesday!
:)
Thursday, July 06, 2017
kitty cat coloring book
When I saw the new kitty stamps from Lost Coast Designs, I immediately thought of my daughter--she loves cats, and loves to color, so these seemed perfect for making her a little hand bound coloring book.
 You'll find the how-too in THIS POST over at Altered Pages.
When I texted the girl child a pic of the stamped images, she replied, and I quote:
"Those are so beautiful I could cry."
So yep, I'm thinking she'll like this little book!
Happy Thursday!
:)

When I texted the girl child a pic of the stamped images, she replied, and I quote:
"Those are so beautiful I could cry."
So yep, I'm thinking she'll like this little book!
Happy Thursday!
:)
Wednesday, June 28, 2017
Independence Day is almost here! 4th of July wine glass charms, or barbecue sauce markers, whatever.
Two party project day! I have mini chalkboard buffet signs to share over at the Altered Pages Artsociates blog,
plus, here are some super easy tags to use for either condiments or stemware. At the 4th of July shindig, we always have at least six kinds of barbecue sauce in squirt bottles, so I was originally thinking these would be perfect for those, but these tags really look like wine glass charms!

 You could fussy cut these, and/or use a paper cutter, but I have a couple of those fancy fine tag punches, which equals way easy for me. Some Pop Tones cardstock from CutCardStock, gluestick, gold wire stars, and blue ink, and we're ready to go . . .
 Punch cardstock bases larger, and the patriotic tags from Altered Pages smaller. Ink the edges of the images.
 Glue the images to the cardstock tags, punch a hole in the top, and add a curled length of the gold wire stars.

 |
| Patriotic on one side, practical on the other! |


Tuesday, June 27, 2017
CAS with gel plate prints and rub-ons

Thursday, June 08, 2017
a pop-up card with monoprint background

Happy Thursday to you!
:)
Thursday, June 01, 2017
4th of July bunting with wooden banners
Have you ever used wood as a base for making banners or buntings? I hadn't, until trying out some Foundations Décor double point banner bases.

Gotta admit, I'm kinda into these now. I originally made a four flag banner with these and lots of Altered Pages supplies, but then changed my mind and the design! You'll find this experiment of "the same, not the same" today in my post at the Altered Pages Artsociates blog.

Gotta admit, I'm kinda into these now. I originally made a four flag banner with these and lots of Altered Pages supplies, but then changed my mind and the design! You'll find this experiment of "the same, not the same" today in my post at the Altered Pages Artsociates blog.
Wednesday, May 31, 2017
pocket full of posies
Hiya! Today at Altered Pages, you'll find the finale to the pretty little flower book. It's now full up of tags and more flowers and bits and bobs, which is always a fun way to end up a project.
 I'm particularly fond of this little faux brass number plate. It just looks nicely realistic, and I didn't have to anything to it, except add the tiny brads at each side. Okay, probably should have used brass brads, but the little diamonds are fun.
Have a wonderful Wednesday!

Have a wonderful Wednesday!
Tuesday, May 30, 2017
mail art and Father's Day origami guts book/card
Did you have a nice Memorial Day? Here is some mail art from 1944, created during WWII:
 I'm sharing this and a Father's Day themed handbound book, today at the CutCardStock blog. It's another origami guts/vellum liner book, with plenty of room for photos and writing and such.


Here's a peek inside--the pockets are all covered with gel prints pulled on deli wrap papers.
Thursday, May 04, 2017
spring flowers hand bound book

A Happy Thursday to you! :)
Wednesday, May 03, 2017
guts for an origami pocket book or card
"Signatures" might be a better term for the insides of this style of book. I like to use this form for the inside of an elaborate card, as well--they're great for holding photos and tags, ticket stubs and gift cards, so really, whatever you have in mind, from mini-album to graduation card, this style can work for you. The directions may seem involved, but really, this is very simple.
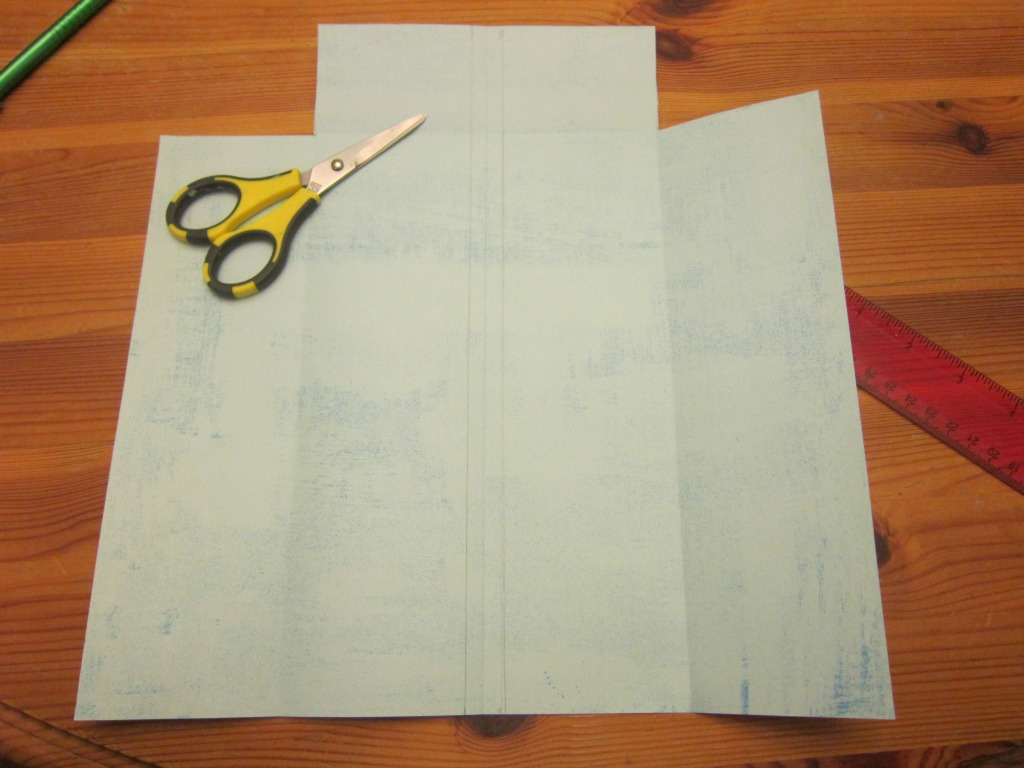
1. You'll need text weight paper, pretty much any size, but probably not smaller than an 8 1/2 x 11. I'm using a 12 x 12 of two sided lightweight scrapbook paper for this demo, hoping it will make things clearer.

2. Fold the paper in half, like a book.

3. Open the paper, and from the top edge, measure down anywhere between 1 and 3 inches--I did 2 1/2 for this 12x12 paper. Fold that down, and open it back up.

4. From the center fold, measure 1/4 inch out on either side, and mark that line from top to bottom lightly with pencil.

5. Fold in the two side edges of the paper, meeting each edge to its corresponding pencil line.

6. Open those sides up, and cut out the two top rectangles--they will be obvious from the fold lines.

7. Fold the side corners in as triangle, meeting them (but not overlapping) the side fold lines.

8. Bring the two edges back in to meet the 1/4 inch pencil lines.

9. Flip the paper over.

10. Bring the bottom edge up to meet the top flap fold--the fold line will be obvious, more so than in the photo, especially this blurry one!

11. Fold that top flap in and tuck it into the pockets.

12. The flaps should hold fairly securely, but I generally glue the edges down.

12. Fold in half, and voila! Finished origami pocket book guts!

Here is the outside cover of my most recent origami book, it has a vellum cover page, and a simple stitched cover. You'll find the easy how-to in this post at the CutCardStock blog, and another book in this same style at the Altered Pages Artsociates blog.
Thank you for stopping by, and if you have any questions about the directions, please feel free to ask, I'd be happy to help!
1. You'll need text weight paper, pretty much any size, but probably not smaller than an 8 1/2 x 11. I'm using a 12 x 12 of two sided lightweight scrapbook paper for this demo, hoping it will make things clearer.

2. Fold the paper in half, like a book.

3. Open the paper, and from the top edge, measure down anywhere between 1 and 3 inches--I did 2 1/2 for this 12x12 paper. Fold that down, and open it back up.

4. From the center fold, measure 1/4 inch out on either side, and mark that line from top to bottom lightly with pencil.

5. Fold in the two side edges of the paper, meeting each edge to its corresponding pencil line.

6. Open those sides up, and cut out the two top rectangles--they will be obvious from the fold lines.
7. Fold the side corners in as triangle, meeting them (but not overlapping) the side fold lines.

8. Bring the two edges back in to meet the 1/4 inch pencil lines.


10. Bring the bottom edge up to meet the top flap fold--the fold line will be obvious, more so than in the photo, especially this blurry one!

11. Fold that top flap in and tuck it into the pockets.

12. The flaps should hold fairly securely, but I generally glue the edges down.

12. Fold in half, and voila! Finished origami pocket book guts!

Here is the outside cover of my most recent origami book, it has a vellum cover page, and a simple stitched cover. You'll find the easy how-to in this post at the CutCardStock blog, and another book in this same style at the Altered Pages Artsociates blog.
 |
| large passport stamps background from Just For Fun |
Thank you for stopping by, and if you have any questions about the directions, please feel free to ask, I'd be happy to help!
Subscribe to:
Posts (Atom)