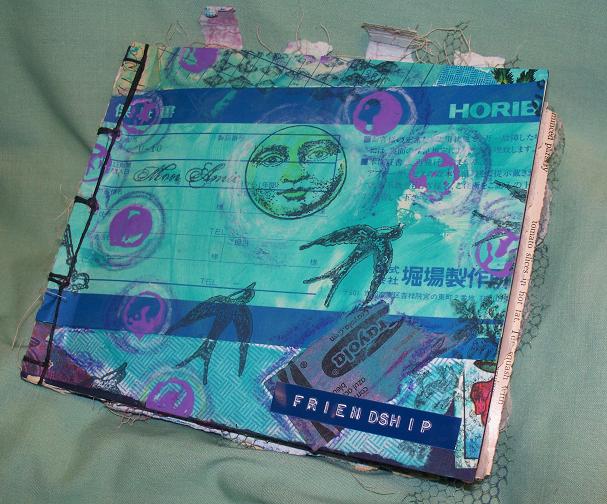
This is the cover for the friendship themed mini book I've been working on . . . there are still several layouts I'd like to complete, but you can see some of the finished layouts if you care to scroll down a bit and take a look.
Made some fall cards using hand painted (well, yes, fingerpainted!) backgrounds, some crayon, and stamping on vellum with black staz-on. The verse stamp is from Our Daily Bread Designs, the Japanese Maple leaf is Stampin' Up.
There's a jewel, too--I always forget how badly they photograph, but people really seem to like receiving cards with a little bling, don't they?
On this beautiful fall day (I hope you're having some lovely weather, as well), if you'd like some autumn inspiration, check out these fun challenges:
So you know I'm easily amused, right? While recently perusing the plethora (speaking of easily amused, "perusing the plethora" is particularly fun to say, just so you know) of rubber at Viva Las Vegas Stamps, this lady literally made me laugh out loud:
She looks a little too happy to me. Maybe I'm just suspicious AND easily amused.
ANYWAY, she's part of a hand bound book layout for this month's Gingersnap Creations Random Challenge: Shared Moments. I may have played fast and loose with the theme, but you can decide:
Some silly Halloween atc mini cards--these are atc size (2 1/2 by 3 1/2, except for the parts sticking over the edges!) using Basic Grey papers, Altered Pages images, some rich textured German Scrap, inks, crayons, tulle, and silly jokes! Not sure where the Mr. Batty die cut flew in from, but there he is . . . the riddle is on the outside, and the atcs open to reveal the goofy answers! I'm thinking these would be great to swap, or as little treat bag tags, or as just a little Halloween greeting.
Hand bound book layout--there's another layout from this same book in the following post . . .
(click to enlarge pics)
Been working on the layouts in a hand bound book; have had this image around for a while, I think it's very striking, and have been itching to incorporate into something.
Challenge me this--- Gingersnap Creations, Gal Pals Card and Scrap, charms Cooking It Up With Kate, green, girl, group of something Crafts and Me Challenges, add a heart I Brake For Challenges, backgrounds Shopping Our Stash, Vintage or Shabby Chic Crazy Amigo Challenge, together The Cheerful Stamp Pad, Let's Reuse--well, most of the elements in this are reused, but the two most unusual ones start with the typed text that came from an old composition book. HOW did she get it typed, when it was bound? I dunno. Maybe she took it apart, typed her notes, and then bound it all back together? Also, the label tapes are adhered to pieces of a shipping envelope that came to us from India. My daughter and I had ordered kurtas, and the envie they came in is a lovely shade of light turquoise, PLUS it has all these fun fibres stringing all over it, so of course I had to save it! It's actually used in several layouts in this book.
Happy Weekend, everyone!
:)
(Don't forget to check out the other friend layout below!)
You can never have too many! (click to enlarge pic)
Don't you like that sassy flapper, shoe flipping photo from Altered Pages? I like how it pairs so well with the shoe stamp, it's from Viva Las Vegas Stamps. This layout is from my latest, friendship themes, hand bound book. Mini file folder page, vintage text page, the sentiment is printed in various fonts on vellum, and the shoes are stamped on vellum. Paints, crayons--the usual!
A real friend will tell you the truth, even if you don't want to hear it, but you can't trust an enemy no matter what . . . that's a quick paraphrase of Proverbs 27:6.
But a looser translation is this: Only a real friend will tell you when your face is dirty.
The latest Spicy Supply Challenge at Gingersnap Creations is to use that crimper that's probably collecting dust in your art room corner. I used mine like my good friend (she would definitely tell me if my face were dirty!) Rhonda showed me years ago.
Take a nice heavy weight piece of cardstock and run it through the crimper oh, maybe 7 or 8 times, different directions, to break down the fibers a little. Then, split the paper down the center and peel it apart, giving you two sheets of crimpy, soft textured, flannelish-looking paper.
You probably know we have chickens, especially after hearing the rooster crowing in the video tutorial, so you may have guessed I'm kind of partial to chicky images. This photo stamp is from Viva Las Vegas Stamps, who is sponsoring some fabulous gifties for this round of challenges, and let me tell you, if you can't find something you like at that store, you must not like rubber stamps. At all.
Really, there is every style under the sun at that place-- funny, sarcastic, serious, sweet, sassy, artsy, cutesy--you name it, it's at Viva Las Vegas.
I'm still suffering from rubber brain overload from my last visit there . . . but it's worth it!
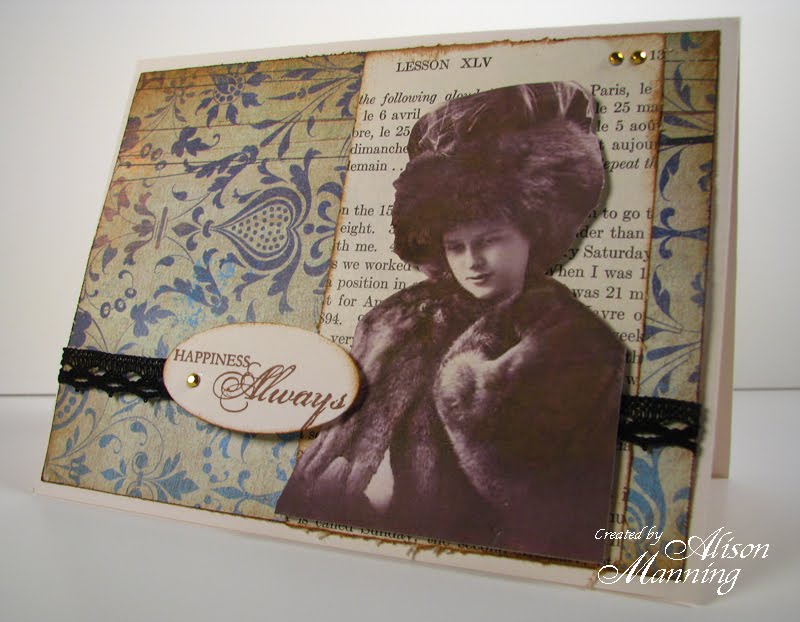
Here are the results of the What Would You Make With My Stuff? Challenge and swap! I want to say a big THANK YOU to all the ladies who played along, all your pieces are so pretty, and it's great how everything is so different, even though I sent the exact same items. The images were the only things that varied, and even they were very similar: (Thank you to Cris for the "stuff" pic--I didn't think to take one until the envies were sent!) The "stuff" included some black lace, iridescent ribbony something, a girl or woman image plus a flower image from Altered Pages, tickets in orange and turquoise, Basic Grey patterned paper, a few tiny jewels & brads, some translucent plastic stars, and a page from a vintage textbook. The challenge was to use at least three of these things prominently, but most of the participants used much more.
1. These first three photos are from Chris Flynn; she posted details of her pocket and tag creation at Redwood Mountain Musings. Chris used almost everything included in the challenge envie! That iridescent stuff made a great dragonfly!
2. Here's To A Good Woman by Sharon Briss Shar at Ill Tempered Ink made a canvas--how pretty is this? I'm all into greens right now, so this beauty charmed me right off!
3. hello kitty by Beth Rudolph That lace was originally black--I really like how Beth painted it to make it her own for this sweet tag. (Beth doesn't have a blog, so don't think I'm ditching her link.)
4. Sing Out by Gerri Herbst Pretty atc by Gerri at It's All Treasure--she used that iridescent stuff in the background, which would never even have occurred to me, and neither would have making a basket from the lace!
5. Happiness Always by Alison Manning Lovely card by Ali at New England Stamper; I'm thinking, you know, I sent Ali this envie with this stuff, but would I have ever made anything nearly this pretty with it myself??? Uh, duh, no!
6. Admit One by Diane: Diane used some of everything except the orange ticket in this beauty. I'm not a "natural" card maker, so I always enjoy a good nosy around Diane's blog--1 Card Creator.
7. Listen To Your Heart by Marjie Kemper: Precious bookmark by Marjie, who always has something inspiring to see at She Who Stamps and Scraps. Marjie wins double triple bonus points for sending me the bookmark in real life, as well as in e-mail life--no, wait, that means I win! THANK YOU, Marjie!
8. I call this a Card Book--it's by Cris Peacock: I'm not entirely sure, but I think she used EVERYTHING in this super fun piece! You can see more of Cris's goodies at "Cris' Page."
9. Let Your Dreams Take Flight by Diane K. I like the flighty trail of gems across this-- you can see more of Diane's art at Diane's Page.
10.I Saw It First by Shelly Schmidt
I'm still looking at this card, soaking in all the elements . . . mostly I'm surprised to see how Shelly used my signature--what a great touch! You can find all the details, and much more, on Shelly's blog, "My Creative Rumblings."
We had one more player, but due to slight complications (if you call breaking a leg and a daughter getting married slight), Mary, whose blog link I can't find to save my life right now (sorry, Mary!), may not be joining us this time around . . .
I made a "real" tutorial, go figure! What's even weirder in my world, is that it's up for all to see at Gingersnap Creations . . . would you please imagine some Twilight Zone type music at this point?
Super Simple Bookbinding Tutorial
Stuff you will need: paper for the pages--plain, colored, or various papers such as: security papers (from envelopes), handmade papers, sheet music, ledger paper, pages from books, vellum, patterned papers
heavy weight cardstock for cover--I usually collage mine first ruler pencil punch tool—either a fancy Japanese screw punch or the type with a needle like tip. If you do not have a punch tool, they are very inexpensive, or you can make your own using a sturdy tapestry/darning needle with the eye end shoved into the end of a large cork.
2 or 3 book binding clips--those big black clips with the silver flippy sides, available in most office supply sections of stores, or (where else?) any office supply store
scissors
some type of "thread"--waxed linen thread, beading thread, embroidery floss, or narrow ribbon--whatever you want to use to bind your book
tapestry needle--basically any needle with an eye big enough to hold your thread
work pad such as a folded up towel, magazine, phone book
What to do: Determine how big you want to make your book, and cut or tear the two cover pieces to size. I like using a ruler as a straight edge and tearing at least one side of the cover, leaving a distressed edge.
Now, select the various papers you’d like to use as pages in your book. I generally use some ledger paper, vintage blank music note paper, handmade papers, some patterned papers, and vellum. You may prefer to have your pages all the same size; I make mine a variety of sizes. You may even want some of the pages to extend beyond the cover of your book—whatever your personal preference.
If you plan to stamp on your pages, or distress the edges, it’s a whole lot easier to do BEFORE binding the book, but I almost always construct the book prior to knowing exactly what's going to happen between the pages. If you decide to distress/stamp/etc. before binding, keep in mind that your pages are going to be bound about ¼ inch in from the left side.
On the front cover of the book, measure in about ¼ inch from the book spine, and make a straight line from top to bottom.
About ¼ inch from the top, and ¼ inch from the bottom, make a dot—these will be holes for binding.
Measure halfway between those two dots, and mark another hole spot. You may want to stop with three holes, but if you prefer five, measure again, half way between the middle hole and the two outside holes, and making two more dots to punch.
After you have your hole spots marked, sandwich your lined-up pages in between the covers, lining up the edges to be bound, and clip together with a couple book binding clips. Place the book sandwich on a work pad of some kind, such as a folded up towel, old magazine, or phone book. This is so your don't scratch up your table and dull your punch tool.
Carefully punch through the hole spots you marked, using the punch tool. You may need to twist slightly, not just jab straight through, depending on how thick your pages are.
Thread your tapestry needle and knot the end of your binding thread/ribbon.
Okay, are you ready for this? Here's a video, which is a whole lot easier to follow than written directions when it comes to something like this, but you'll have to bear with me and be merciful. We've never made a video before, and I sound like total dork, but at least you'll be able to follow along . . . I hope . . . and yes, that is a rooster crowing in the background!
Need some ideas? Here are some books I've made using this super simple book binding technique: Spring
No, I haven't disappeared, just busy with end-of-summer happenings. The results of the What Would You Make With My Stuff? Challenge are coming up, and so far, everything has been fabulous--I'm excited to share all the lovely creations with you all!