Wednesday, August 29, 2012

what's on your workdesk? Wednesday, #169

Some Rogue Redhead and Our Daily Bread stamps, making a card
for my friend Sharon's birthday:
Some hand made paper flowers, those are from book pages, and
some velvet Prima leaves and baubles, too.

Here is the finished card closed:
Rogue Redhead "Milliner Misses" plate

And here it is open:
The patterned papers are from an 8x8 paper pack I received as a gift from
the oldest son's girlfriend.  Well, okay, she WAS his girlfriend--now she's
his fiance!

And that's what's happening here--I am little late joining the fun this week,
but will still have a good blog snoop later on at Julia's.   If you leave me a
comment, I will be sure to come snoop at YOUR workdesk, too!

:)
Challenges:
Rogue Redhead Designs--use at least one square, circle, and rectangle
Word Art Wednesday--use any uplifting sentiment or verse
House That Stamps Built--flowers, stamped or otherwise
Simon Says Stamp--anything goes!

Tuesday, August 21, 2012

what's on your workdesk? Wednesday #168

Today, you get to see a whole view of one of my tray table desks:
It's pretty much all the stuff left over from making the altered box, finding new
life as a back-to-school pencil box.

The other tray table, you only get to see a sneak peek:
(This is for my next article at Unruly Paper Arts.)

That's it for me this week--leave me a comment, and I'll be around this week
to see what's on YOUR workdesk!  Thank you, Julia, for the weekly, worldwide,
blog snoop!

:)

Sunday, August 19, 2012

altered box for back-to-school

Altered box, for a slightly steampunk, 
back-to-school pencil box:

all stamps from Blockheads
Believe it or not, this box used to hold baseball cards--okay, it was one pack
of high-end baseball cards, and the box is perfect for altering!  You can barely
see the slit where the box opens, at least in this pic, unless you enlarge it.


I think this could be for either a boy or a girl, but I did put some pink crayon on
there, not much . . .

Can you tell everything is stamped on pages from old textbooks?

Stamp sets used:
Architecture
Stargazer
Plus that great pencil background from Lost Coast Designs,
along with Dylusions sprays in Lemon Zest and Fresh Lime, and crayons, of course!

Happy Sunday, everyone!
:)trisha

Wednesday, August 15, 2012

What's on Your Workdesk? Wednesday--another quilty charm

A BIG thank you to everyone who commented on my quilty charm
last week, I believe I commented back to everyone, and am going to double
 check, so please don't be offended if I missed you.  I did find the camera, but
 then (not concocting stories here, unfortunately) our  computer essentially died.
 
We (by "we" I mean our computer savvy sons) are still trying to retrieve
some things, but my husband's answer to the problem was to just buy another one. 
Not a whole new set-up, or son, for that matter, just the computer section. 
It works fine, but I'm not used to it yet, so it's still slow going . . .

ANYWAY blahbiddy blah, enough of that!  Here is the next quilty inchie
charm in my series for Altered Arts, I think I like this one even better:
collage image from Altered Pages

Still an inch square, aside from the glass beads, those do extend beyond the
quilty border somewhat.  Omni Gel transfer, bit of lace, Altered Pages image.

So I'm off for a big ol' blog snoop, and you can join the fun too at Julia's
What's on Your Workdesk?  Wednesday party!

Oh, you know I'm entering this in the Frilly and Funkie challenge:
Get Crafty with Canvas!  You can really see the canvasy texture in this pic, too.


Sunday, August 12, 2012

sewing themed, hand bound book--a little bigger one this time!

cover

Here is the book I recently finished off for the current challenge at
Blockheads--one near and dear to my heart, the challenge is:
Use Any Book Binding Technique and Some Stamping.
Well, okay, I think the official name is something like "Simple Book Binding
Techniques," but we really don't care what type of binding you use, so if you're
all into coptic and kettle binding, feel free to show and tell, by all means!

Our Lives Are Like Quilts
You can tell from the quotes it's another sewing themed book . . .

A Bed Without A Quilt


 That dreamy face--she's perfect for that quote . . .
she's from the Years Ago set (link below)


small center insert

Are you tired of seeing that spool of thread in all my books yet?

Love Is The Thread

images from the Years Ago and Sewing sets

Those Who Sleep Under A Quilt
You can tell I got to use lots of goodies in this one--
stamp sets:
Year Ago 
Feeling Regal
Sewing
Vintage Light And Form and Notions
more fun stuff:
Willow Walnut Ink , Lilac Walnut Ink , Cornflower Walnut Ink ,
Cherry Blossom Walnut Ink , plus gelatos in cool  and  warm colors.

Have you joined in the Blockheads book challenge yet?  If you need some easy
binding ideas, check out the tutorials.  Be sure to leave a pic and link to a 
specific post that mentions the Blockheads challenge HERE.

I really enjoy making books, and hope this technique challenge
(or the possible $25 Blockheads gift certificate!) inspires you to try 
one of your own.

A few more challenges:
Word Art Wednesday--always any inspiring sentiment or scripture 
Fashionable Stamping Challenges--favorite summer ice cream (rainbow 
sherbet, my absolute favorite!!)
Crafting for All Seasons--bright colours


Friday, August 10, 2012

technical difficulties.

Due to technical difficulties (that's code for the computer is dying), I may be slow in blog visiting/posting this week.

But, in case you were wondering, I DID find the camera!

See you soon, I hope!!  

:)

Wednesday, August 08, 2012

woyww #166--art charms for Altered Arts

You know how some people can't show you their desks, because
they're working on a gift, or some super-secret design team project?

Well, nothing that intriguing here.  I can't show you my desk, simply
because the camera is missing in action.

***sigh***

Anyway, I CAN show you this already-photographed charm, which
I'm also sharing for Altered Arts magazine--it's a tiny quilted
inchie, using an Omni Gel transfer, with glass beads and a bit of lace:

image from Altered Pages


It really IS just an inch square--I'll share another charm soon.

Happy What's on Your Workdesk Wednesday, everyone, and thank you
as always to Julia for hosting this weekly event!

Some challenges?  Yes, please:
Frilly and Funkie--get crafty with canvas
Word Art Wednesday--as always, use an encouraging word, sentiment, or scripture
Oldie but a Goodie challenge--Friends, and (always) use at least 6 mos old:
the beads, trim, image, and thread

Wednesday, August 01, 2012

make your own simple bound art journal with fabric cover

There are quite a few tutorials out on the intraweb for making
pretty much this same type of journal--this is a condensed,
super simple blend of a bunch of them.  If you've never
attempted binding before, this might be a good place to start.

What you'll need:
paper for the inside pages--you can use any decent weight paper
you want, any size, really.  This book has 16 pieces of paper, which
makes for 32 pages in the finished journal.

a piece of fabric a little bit wider and about 6 inches longer 
than the paper--we have three boys around the house, and I always
save their ripped up jeans, so denim it is for this one.
  
punch tool--if you don't have one of those pokey tools, a darning
needle with the eye shoved into the end of a cork works okay, or
of course an awl

darning needle
embroidery floss or other similar stuff to bind the journal, about
about 4 times as long as your book is wide, PLUS about 20 inches--
it doesn't have to be exact!
big button for the clasp
ruler, pencil, and clamps--I use the big black flappy paper clip type,
but clothespins will work okay

optional:  bone folder, stuff to embellish the fabric cover such as
paints, fabric stamps/inks, lace, etc.

1Fold all the papers in half If you have a bone folder, now would be
a great time to use it . . .
2
Open the papers, neatly stack them, and clamp them together.
3
Using the ruler, measure the center of the fold line and mark it with a dot. 
4.  Measure out from the center dot about 2 inches on either side along the
fold line and mark with dots.  You may want to measure out a little further
or a little less on each side, depending on how big your paper is--just make it an
equal amount from the center on each side. 


 5.  Using the punch tool, carefully poke through the entire thickness of papers
on the three dots you made.
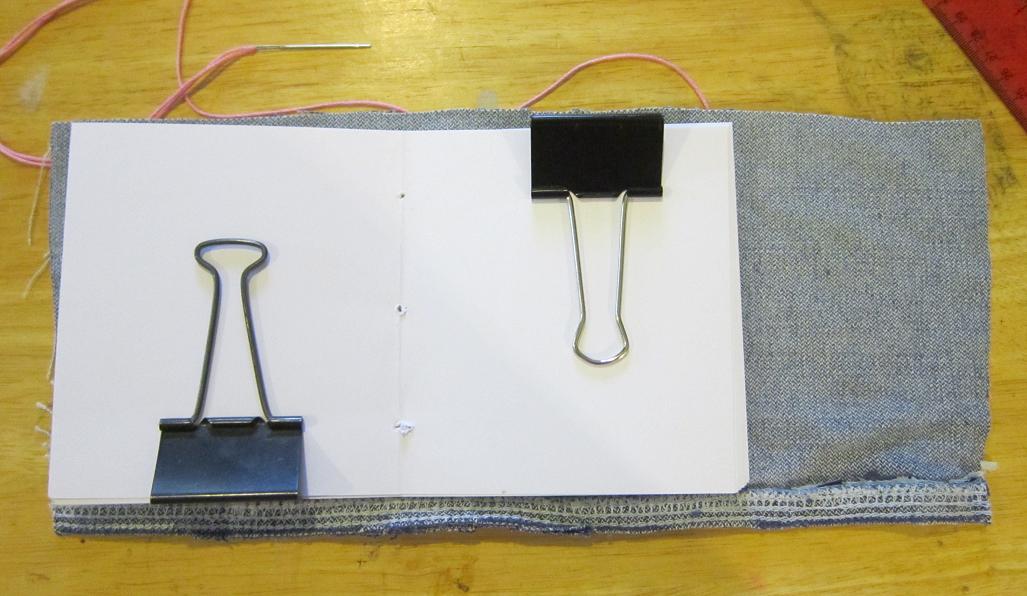
6Thread the darning needle with embroidery floss--don't knot the end.  Place the
papers on your fabric as shown.  The longer side of fabric will wrap around the
finished journal.

7Keeping on the clamps, close the papers slightly, and mark on the fabric where
the three holes are.  These marks will be your stitching guides.


8.  Come up through the back of the fabric through the CENTER HOLE, leaving
about a ten inch tail hanging out the back side of the fabric.  This tail will later
be what wraps around the button to clasp the journal closed.  Continue through the
center hole of all the papers, and tighten the floss enough that the papers aren't
loose, but not so tight that the papers will tear when you try and turn pages in the
finished journal.

9
Sorry, didn't get a pic of this--you're on the inside center of the papers with the
floss--now go through one of the outside holes, through all the thicknesses of
paper and fabric,  through to the appropriate mark on the fabric.
Tighten the floss a bit.

10
Now go over through the other hole you haven't visited yet--be careful to
line up the mark on your fabric to the hole on the paper--

and again pull through all the thicknesses of paper.

11. Go through the center mark again, and through to the back cover where
you will---

arrange the floss so there is one tail on each side of the giant outer stitch.  Tie a
knot securing the giant stitch, and trim the ends to match, if you like.  (Take off
the clamps . . .) 

12Wrap the fabric cover closed, and decide where the button clasp will be.
13.  Stitch on the button, then wrap the floss around the button to close the cover.

See?  There it is again.  Well, yes, okay, I painted mine . . .

What do you think?  Have you ever constructed your own journal?  Leave me a
link, please, I wanna see, and come join in the Reader's Art Quests at Unruly
Paper Arts--this month's RAQ themes are "Dear Diary" (art journal pages, anyone?)
 and "Scrapbook Page."

It just so happens that the current challenge at Blockheads Paper Arts is to use
any bookbinding technique--you can find the details HERE.

What's on your workdesk? Wednesday #165

 This is what was on my workdesk, and bits of it still are, but I finished this fellow off:

Little Jimmy Van Houten's preference for lemonade was never revealed to the public.

I think if I were to do it over, the smarty little sentiment would go on the inside, but
there it is.  The image is from Artistic Outpost, the Think and Wonder plate. This is
my second go with an image from this charming plate, you can see the first HERE if
you like, and some other AO cards, as well.

Happy WOYWW to you!  If you aren't familiar with What's On Your Workdesk?
Wednesday, stop by Julia's for a look . . .

And look at that, the Artistic Outpost challenge this month is Anything Goes.
Little Jimmy wants to play!